
Observing Jupiter in 2001
By Damian Peach
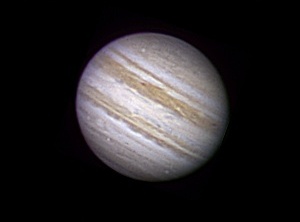
Fig 01: A CCD image of Jupiter obtained by the author on October 13th, 2001 , revealing many fine details across the face of the Planet.
Introduction
Many early risers, and observers out in the early hours will have no doubt noticed that the Jupiter and Saturn are again visible before sunrise, and creeping higher up from the twilight glow each morning. The coming opposition of Jupiter on Dec 31st – Jan 1st is especially notable for northern hemisphere observers, as Jupiter will reach its most northerly declination of its path around the Ecliptic. This means Jupiter will be high in the sky for much of the night with southern areas of the UK seeing it reach more than 60 deg above the horizon. Jupiter is well placed in the winter constellation of Gemini, and will be placed just 2 degrees south of Epsilon Geminorum.
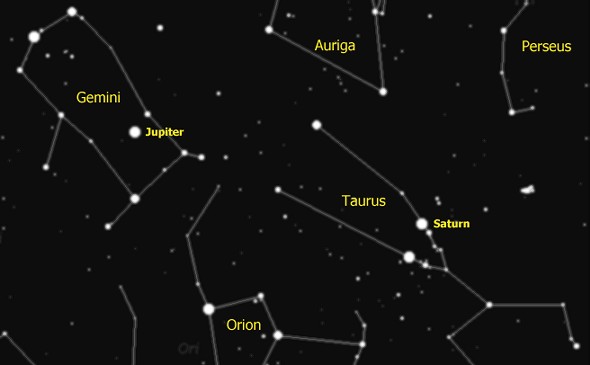
Fig 02: Above is a map showing the positions of Jupiter and Saturn during Dec 2000. They will remain within a few degrees of this throughout the next 12 months.
Basic Observational Information
Jupiter’s
observable atmosphere is structured in alternating dark belts and bright zones.
The actual boundaries of the belts and zones aren’t defined by their
appearance, but by the latitudinal boundaries, defined by the fast moving
atmospheric Jet streams that keep everything “in check”.
Jupiter’s rotation period (unlike that of Earth) is divided into 3 systems due to the material of the equatorial regions moving faster than the material further north or South. They are called System 1 (the equatorial regions as far north as, and including the NEBs edge and SEBn edge.) System 2 (the rest of the planet down to the NEBs edge and SEBn edge) and System 3 which refers to the rotation period of Jupiter observed at radio wavelengths, and thought to be the rotation period of the Planet’s core.
Planetary Information:
Equatorial
Diameter: 143,082 Km.
Polar
Diameter: 133,792 Km.
Rotation
Period of System I: 9h 50m 30s.
Rotation
Period of System II: 9h 55m 40s.
Rotation
Period of System III: 9h 55m 30s.
Mass:
1.9 x 10to27 Kgs (as much as all the other Planets put together!.)
Mean
Albedo: 0.52
Mean
distance from Sun: 730 million Km.
Mean
distance from Earth: 581 million Km.
Angular Diameter: 31” – 50” arc seconds.
Observing Jupiter
A
question many beginning observers ask is “what can I see on Jupiter?”. The
answer is generally a great deal with patience. A 15cm (6”) reflector or 10cm
(4”) refractor will reveal all the major dark belts and bright zones, as well
as features such as the Great Red Spot and wispy Festoons. Those with larger
telescopes in the 20cm + range Jupiter reveals a wealth of fine detail. Jupiter
shows a great range of features, and the terminology takes some getting used
to!. The two major belts of the Planet are the North Equatorial Belt (NEB) and
South Equatorial Belt (SEB.) All the major belts and zones are displayed in the
diagram.
Also
there are the 4 larger Moons – Io, Europa, Ganymede and Callisto. The can be
seen and followed in Binoculars, and larger scopes show them as small disks.
Experienced Observers with larger scopes (25cm and up) under good seeing may
want to observe Ganymede. This probably sounds ambitious, but under excellent
seeing dark markings can be seen on its surface at high magnifications.
The
major limitation the observer will find (given his telescope is of good quality,
and he/she has the telescope in good collimation) is atmospheric seeing. Many
reading will no doubt have been disappointed with the views of Mars this summer,
with it being so low in the sky from the UK. This is due to atmospheric
turbulence. The lower an object is in the sky, the more atmosphere its light
passes through before it reaches the observer. As example, this Jupiter
opposition we will see the light of Jupiter passing through around 5 times
lesser atmosphere than we see the light of Mars pass through from UK skies (at
there respective highest altitudes.)
Using coloured filters
One
great observing aid not just for Jupiter, but all the Planets is coloured
filters (which screw into the bottom of the eyepiece.) These can give clearer
view of features, and also aid in estimates of the intensities of various
features. For Jupiter the most useful filters for the visual observer are Red
and Blue. Smaller scopes (less than 20cm aperture) may prefer Orange or Light
Blue. As example I prefer using Orange to Red even on my 30cm reflector. Filters
worth considering are Wratten #25 (Red), #21 (Orange), #38A (Dark Blue) and #80A
(Light Blue.)
Red Filters will help enhance the blue coloured areas of Jupiter. They also penetrate the Violet absorbing haze that hangs over Jupiter’s atmosphere, so will penetrate deeper into the atmosphere. Red or Orange filtered views tend to be by far the most detailed, and I highly recommend them. Blue Filters will enhance the redder coloured areas of the atmosphere, and the belts will appear very dark through this filter. The GRS also appears much darker in blue coloured filters. Observers using CCD cameras can employ a wide range of filters, which I will go into later.
Making Planetary Sketches
Observers should also attempt to draw what they see. A plain note pad and pencil will suffice to start with, or proper drawing Blanks can be obtained from the British Astronomical Association. The observer, before starting sould select a magnification that gives the sharpest image. Around 20x per inch of aperture is a good starting point. I use a range of 235x – 405x on my 30 cm Reflector, depending on how good the seeing conditions are. The observer should try to complete the drawing in around 15mins, as to avoid rotational effects. It’s also worth taking notes on features (how dark they appear, shape etc.) One important area is to try to estimate the exact time a feature crosses the Central Meridian of the Planet, and note its appropriate System I or System II longitude. This way we can follow the drift of features over time, and understand their movement. Drawings through colour filters are of the most use, since actual colour drawings can be very subjective.
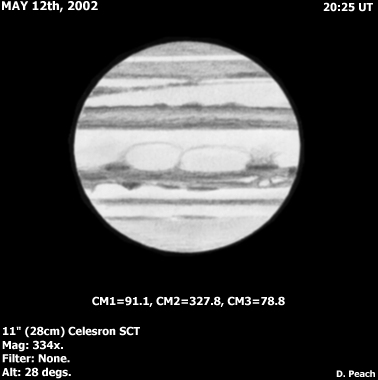
Fig
03: An observation of Jupiter made by the author using a 28cm Reflector under
fair (p3-6) seeing conditions. Amateur telescopes can reveal a tremendous amount
of detail on the Planet.
CCD Imaging & Photography
As
well as being a fascinating target for the visual observer, Jupiter is an
CCD
imaging of Jupiter in the last few years has revolutionised Amateur study of the
Planet. Experienced amateurs today are regularly producing CCD images with 20cm
(8”) – 40cm (16”) Telescopes that exceed the quality and resolution of
photographs produced from Mountain top observatories 20 years ago. The very best
images produced can resolve low contrast features down to around 0.2” arc
seconds, giving such images an almost “HST like” appearance.
CCD
imaging is of course much more difficult, and often more frustrating than
observing visually, and certainly costs allot more. A good 8” (20cm) scope and
suitable CCD camera will probably set the observer back around £3000. Of course
a larger scope and better camera will push the cost higher still.
Obtaining
good images will take allot of practice and patience. Most areas of the UK often
suffer from poor seeing conditions, which make obtaining that good image
difficult. One the basics of the observers scope have been mastered
(collimation, focusing, tracking) they will be ready to undertake a night of
imaging. I can’t stress enough the importance of properly collimating the
scope. The observer should check the collimation before observing or imaging,
and make the adjustments if needed. Also one the CCD camera has been attached,
don’t rush focusing. Take as much time as is needed to reach perfect focus.
Start with unfiltered imaging. Get used to using the telescope and CCD camera
and software before attempting the more challenging Tri Colour imaging.
Tri
colour CCD imaging is the most challenging area. One must obtain a Red, Green
and Blue filtered image in under approximately 2 minutes, or the final combined
colour images will stack without first correcting them for rotational effects.
Exposure times will vary depending on the Filter and Transparency.
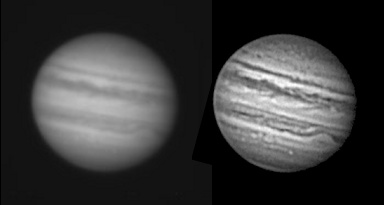
Fig 04: Above is an example between a raw image obtained in good seeing conditions, and the final processed image, after sharpening. The difference is very significant. Images by Don Parker, USA. North at top.
Once
the observer has obtained the raw images, they can proceed to process them.
Unsharp Masking is by far the most common routine used for sharpening images,
and works very well. One should be careful not to over sharpen there images, but
process them so as much detail as possible is displayed, with as little visible
noise visible as possible. The processing images example is a good example, with
detail well contrasted but no noise (giving the image a “grainy” appearance)
is visualised. This is easier said than done, and practice with the software is
the best answer to find a routine that works.
CCD imaging and processing is a subject all of its own, and I would advise readers to seek out articles in magazines and books which go into much more detail than I have covered here.
Observers
should consider sending there visual drawings and CCD images to the British
Astronomical Association. Observers can find information on the Jupiter
section’s activities on their web page.
![]()
Copyright © 2003-2004. www.damianpeach.com. No material used within this website may be used, amended or distributed without the consent of the webmaster.